Inspiration
I started generating ideas for my double page spread by looking at and deconstructing other double page spreads. For example, this Q Magazine double page spread. This is where I got the idea for a simple and tasteful line border. This is also where I got the idea to write both the date and the magazine name beneath the lower border, adding to this professional, simple look.
This also helped me get a taste for what a professional double page spread looks like and is what
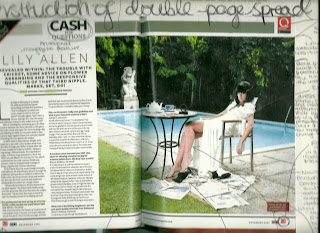
made me decide to separate each chunk of Q&A so as to make my page neat, tidy and simple to read.
This is the other double page spread I deconstructed. I really liked the layout of this page and wanted to sort of combine both this layout and the above layout. I did this by having a large title, similarly to that of the Dizzee Rascal DPS. I thought this made the page look incredibly eye catching and original, as did the amount of pictures.
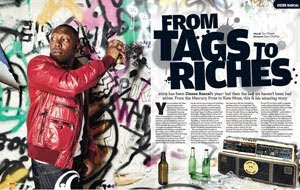
I liked the way in which instead of combining both text and images on the same page, the two double page spreads I deconstructed both had a page of text and a picture that took up an entire page. I therefore decided to do this myself. Both double page spreads made this effective by using eye catching and interesting pictures to take up their page. I therefore decided to do the same but in my own style, this is how I came up with the idea to have a 'photobooth' theme.
Q Magazine was very helpful when creating my double page spread as the double page spreads I looked at were very themed around the artists, helping to give me ideas for my own. For example, for the Lily Allen double page spread, it's clear to see the angle they've taken it from is that she is trying to change her original lower class and teenage look into a more sophisticated, mature look. Hence the entire layout of the spread is classy and formal. Similarly, the theme is the complete opposite for the spread on Dizzee Rascal, keen to keep his 'grime' image, appealing to a younger audience by decorating the page with graffiti and bright colours.
I therefore did the same with my own, my artist keen to keep her dignity and sense of togetherness in my article, therefore the page is calm and formally laid out. The page is also kept sophisticated and understated via the use of black and white. The youth of the artist has been kept however via the subtle uses of an original and subtle combination of pink and yellow, representing happiness and femininty. As well as this, I decided to make certain words of the title bigger than others, coordinating with the front page and keeping a sense of jumbled youth.
Creating My Double Page Spread
I began by opening my image in
Photoshop, and using the magic selection tool to highlight the background surrounding my model.
Next, I selected
Image > Adjustments > Levels and adjusted the dial to make the background completely white.
I then used the
magic selection tool again to highlight th
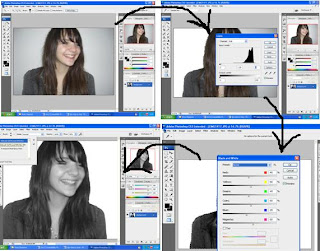
e model and then selected
Image > Adjustments > Black and White so as to make the model black and white!
I then selected the eye dropper tool and clicked my models face so as to get her correct (now grey) skin colour. I then selected the
brush tool, and then the
airbrush option and used this
tool across my models face to even out any imperfections.
To prevent the used of the
brush tool looking too obvious a
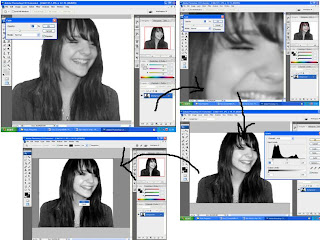
nd unnatural, I selected
Edit and then
Fade brush tool, and adjusted the dial to help it blend and look more natural.
Using the
brush tool again I chose the colour black and brushed it across my models eyelid, to make her look as though wearing more make up. Again I repeate the before step, selecting
Edit > Fade brush tool and adjusting the opacity to make it look more natural.
Next, I again selected
Images > Adjustments > Levels and
edited the
levels so as to make my models face look brighter and more 'glowing'.
I then cropped my image by selecting the
crop tool, dragging the it across the part of the image I wanted to keep and then right-clicking the image and selecting
crop to get rid of any excess background and keeping the main focus on my model.
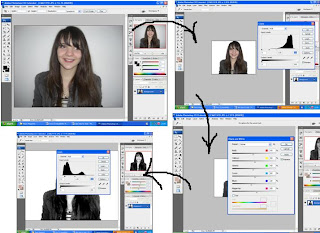
I then began to edit my next image. As before, I used the
magic selection tool to highlight the background and repeated the steps to adjust the
levels and make my background white.
Again, I made my model black and white by selecting
Image > Adjustments > Black and white.
To make my models face bright as I did before, I selected
Image > Adjustments > Levels. I then edited the levels even more than I did before so as to make it look as though the flash of the camera had brightened her face. I did not do this on the last image because focal points such as her eyes were closed and I did not want to wash out the features of her face.
To help my models eyes stand out, I used the
magic selection tool to highlight her pupils and then adjusted the
levels as before but in the opposite
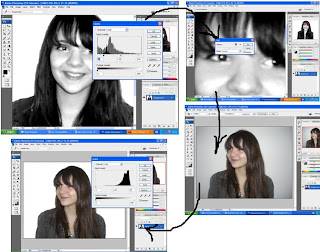
direction to make them darker. I then repeated the before step of adding a black line on my models eyelid to help it stand out and make her appear to be wearing more make up, using the brush tool. I then sleected
Edit > Fade brush tool so as to make it look more natural.
I then opened up my next chosen image into
Photoshop and began editing it in the same way as the last two to help them coordinate.
Again, I began by using the
magic selection tool to highlight the background, and then selected
Image > Adjustments > Levels and then adjusted the dial as before to make my background white
 I then selected Image > Adjustments > Black and white again to make my image black and white! I then selected Image > Adjustments > levels and edited the levels to make my model look as though the cameras flash had brightened her face.
I then repeated this step, using the magic selection tool to highlight only her lips and moving the dial in the opposite direction, thus making them darker and helping them to stand out.
I then cropped my image as before so as to get rid of any excess background.
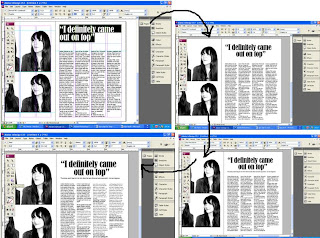
 I put my images into InDesign by creating a new blank document of three pages so that I would have two conjoined pages for my spread. I began by selecting the picture tool box and dragging it into a box about the size I thought I would need. I then selected File > Place and selected my first image.
To make my image fill the frame properly and proportionally (withouth it coming out b lurry and overstretched) I selected Fitting > Fill Frame Proportionally.
To begin editing my next photo, I again used the magic selection tool to highlight the background and then selected Image > Adjustments > Levels and adjusted the dial to make the background white.
 Again, I adjusted the levels to make my models face look bright and as if lightened by the camera flash.
Next, I selected Image > Adjustments > Black and white. I then selected the eye dropped tool to get the correct colour of my model and then used the brush tool > Airbrush and evened out my models complexion!
 Having completed editing this photo, I continued to add each image into my InDesign document, using the same method as before (File > Place > Choose Image > Right-click > Fitting > Fill frame proportionally). I created margins/guidelines on the page by clicked on the rulers on both the left hand side of the page and the top of the page and dragging them down to the position I wish for them to be in, thus creating a light blue guideline.
This helped me position my images in a neat and tidy fashion with all the images the same size.
 I then created a guideline for where I wanted my text (I wasn't completely sure how much space I'd need so just used it as a guide). I had previously written a draft for my article which had then been approved by my teacher. I opened the final document in Word, dragged the cursor across it to highlight all of the text and then right-clicked and selected copy. I then inserted a text box in InDesign and dragged it across the space I had allocated as a guide. I then right-clicked within the text box and selected 'paste'. The text was automatically inserted into the first column. To evenly distribute the text evenly throughout the rest of the columns I selected the small red icon that appeared at the bottom right hand corned of the column filled with text. I then clicked on the next column and repeated this step, thus evenly distributing the text!
 Next, I inserted another text box in the space allocated as a guide for my title and subtitle. I inserted within the text box a quote from my article, thus giving an indication to my readers of the nature of the interview.
I then began to play around with the title, changing the font and font size, editing the height and width and trying to get it into a position and layout where I felt it looked best.

I began by making the title the same font used for the quote on the front page so as to make the two coordinate and also to show a link between the two. I then centred the quote/title to give it the appearance of actually being a title and to tidy the page up. I did this by changing the paragraph alignment of the text using the text options.
I then inserted another text box beneath the title and inserted my short description of the article. I did this in another text box so that I could change the positions of the two different text boxes to create a different layout should I decide to. I then highlighted the questions in the text and made them Bold using the text options so as to indicate that they were the questions and the text that wasn't bold the answers. I also did this to separate the two and prevent them from blending into one big chunk of text and making it difficult to read/understand.
 I separated the introduction at the beginning of my article so as to make the page neater and the introduction easier to read.
I then changed the font of the title because I felt the original font to be too chunky and bold to suit a fairly long piece of text, I therefore chose a similar, yet thinner font (Georgia). I did the same for the description beneath the title, helping them coordinate and again helping the page stay neat and tidy.
I inserted my chosen 'red carpet' image of my model, which I edited in the exact same way to how I edited the other images on the page (bar editing the levels to give her face a bright shiny look since this suggests happiness and health - something I did not want this image to convey, instead I only edited the levels slightly to give the impression of a camera flash)
I then separated each Q&A by pressing the 'enter' key beneath the end of each chunk of text. This helped to make my page easier and simpler to read, as well as making my page a lot tidier and professional looking.
 In the same way to how I centred the title, I centred the description beneath the title to help the two align and look neat and tidy. I also inserted the text saying who wrote the article and who did the photography (both me of course!). I inserted this text as part of the title so as not to make it stand alone and steal attention, yet by putting it next to the title it is pretty much impossible to miss - so people know who did the text and writing and know who to contact should they wish to use my services!
I then inserted a black line at the top and bottom of the page as as to create a neat and simple border. In the left hand corner of both pages I inserted a small 'B' in the same font as the front covers masthead, creating a 'Blast' logo, and 'stamping' the spread with Blasts name so that the content is exclusive to my magazine. I also included the month and year of the issues release for future reference, both features create a professional look to my spread.
Similarly to my front page, I made certain words of the title bigger than others, simply to highlight important words such as 'definitely' and 'on top'. This also gives a certain message to the reader of the way in which the interviewee said these words.
Next, I highlighted the speech marks and adjusted the colour of them by selecting the colour panel. I spent a lot of time trying to work out which colour and what shade to use, experimenting with similar colours to that of my front page. However, since this page is supposed to be emanating the subjects new found happiness I decided blue (the connotations being cold and sadness) was not the right way to go. I instead settled on a yellowish pink, the combination of both having connotations of both femininity and happiness (pink being feminine, yellow being happiness). Both these colours also suggest springtime - ideal for a March issue. I decided only to make the speech marks colourful because I wanted to keep the black and white theme. I experimented with other features being colourful but the addition of too much colour looked tacky and too young for my target audience. I also added a line beneath the title and made it the same colour as the speech marks so as to coordinate. I did this by using the line drawing icon (the same way I created the border) on the toolbar. I did this so as to make the page look more neat and professional and also to seperate the title and description from the actual article.
Having been compressed into a narrow column, a lot of the words in my article had been separated then hyphenated to rejoin. To get rid of this, I highlighted all the text and then clicked on the small paragraph symbol, I then scanned the navigation bar  and unchecked the word 'hyphen' so as to get ride of this. I did this because when hyphenated, the text looked both untidy and unprofessional - neither of which did I want for my magazine!
I then finished by making small changes such as moving the piece of text where I credit myself with both the images and words, simply to make the page look better!
Feedback from other students really helped me to decided what colour looked best for my speech marks since I was unsure of what colour looked best. Asking about the appearance and layout of my DPS really helped too as it was nice to receive reassurance regarding the appearance of my product. Everyone I asked was happy with what I produced and I asked them questions about it based on the title and whether they thought small things edits such as the font was suitable and the images looked good. There were no suggestions on how to approve my page and so I left it how it was!
 My Final Product
 The simplicity of it makes the page look simple and not too fussy, implying the artists state of mind as being simple and together after the last few months of chaos! I did not make this the same colour as the line beneath the title because this made the page look washed out and tacky. The black makes it look bold and helps it to stand out without being too attention grabbing. It also coordinated with the black and white of the images, making it look tidy and sophisticated.
 used a very plain and simple font so as not to overcrowd the page and also to keep the focus on what is being said as opposed to any visual stimulator's.
 along the way.
 good since it is right in the centre! I centred the text so as to make it look like a title in its own right and also simply to make it look more neat and tidy (a layout requested by my target audience).
 cheesy! I also did this so that readers get an impression of the nature of the interview, even if this may not be an entirely accurate impression. The quote I pulled out of context suggests that the interviewee is being perhaps either self righteous and a bit rude, or is being strong and confident. This encourages my audience to read on due to intrigue and the want for gossip.
  e of colloquialism and slang - both of which are used by my target audience and therefore fitting in with the rest of my magazine. I wrote 'words' and 'snaps' in writing coordinating with the rest of the page and in bold to help them stand out and wrote my name in the same font but in italics simply to detach and separate it from the rest of the text. Another reason for the use of bold is so that I would not have to use a colon, making my page look messier. This way even the smallest of detail is kept tidy and styled - fitting in with my readers attention to detail!
 zine with it. I also did this to brand my spread and put my mark on it, I also did this using the date, should there be any future reference to the spread. This also give the spread a more professional look, similar to the double page spreads of Q Magazine. I wrote this beneath the border to as to give the appearance of a template, again creating a more professional look and giving the impression that double page spreads a regular feature of my magazine.
 I laid out my photos in a photo booth format. This makes it seem as though they have been taken one after the other (which they had!), creating a natural and casual look for the model.
 singly more urban and street than the look of my model, here I am challenging this stereotype and showing that sometimes these artists are not just about the 'look' and the lifestyle, but sometimes about the music. My models dressed down look and casual and perhaps more typically indie hairstyle.
 to recreate the more casual and natural yet classy look of other urban music artists such as Beyonce:


 Again, I adjusted the levels to make my models face look bright and as if lightened by the camera flash.
 Having completed editing this photo, I continued to add each image into my InDesign document, using the same method as before (File > Place > Choose Image > Right-click > Fitting > Fill frame proportionally). I created margins/guidelines on the page by clicked on the rulers on both the left hand side of the page and the top of the page and dragging them down to the position I wish for them to be in, thus creating a light blue guideline.

